WordPress “top secret” migration SEO tip: how to hack Yoast
by Nate Holman on August 7, 2018
/ 0 comments leave a reply
Did you know that if you’re doing ANY site migration involving 301 redirects where the domain or URL structure changes (Shopify > WordPress, olddomain.com > newdomain.com), that Google recommends you submit the old site’s XML sitemap(s) in the new (destination) site’s Search Console property?
It’s true:
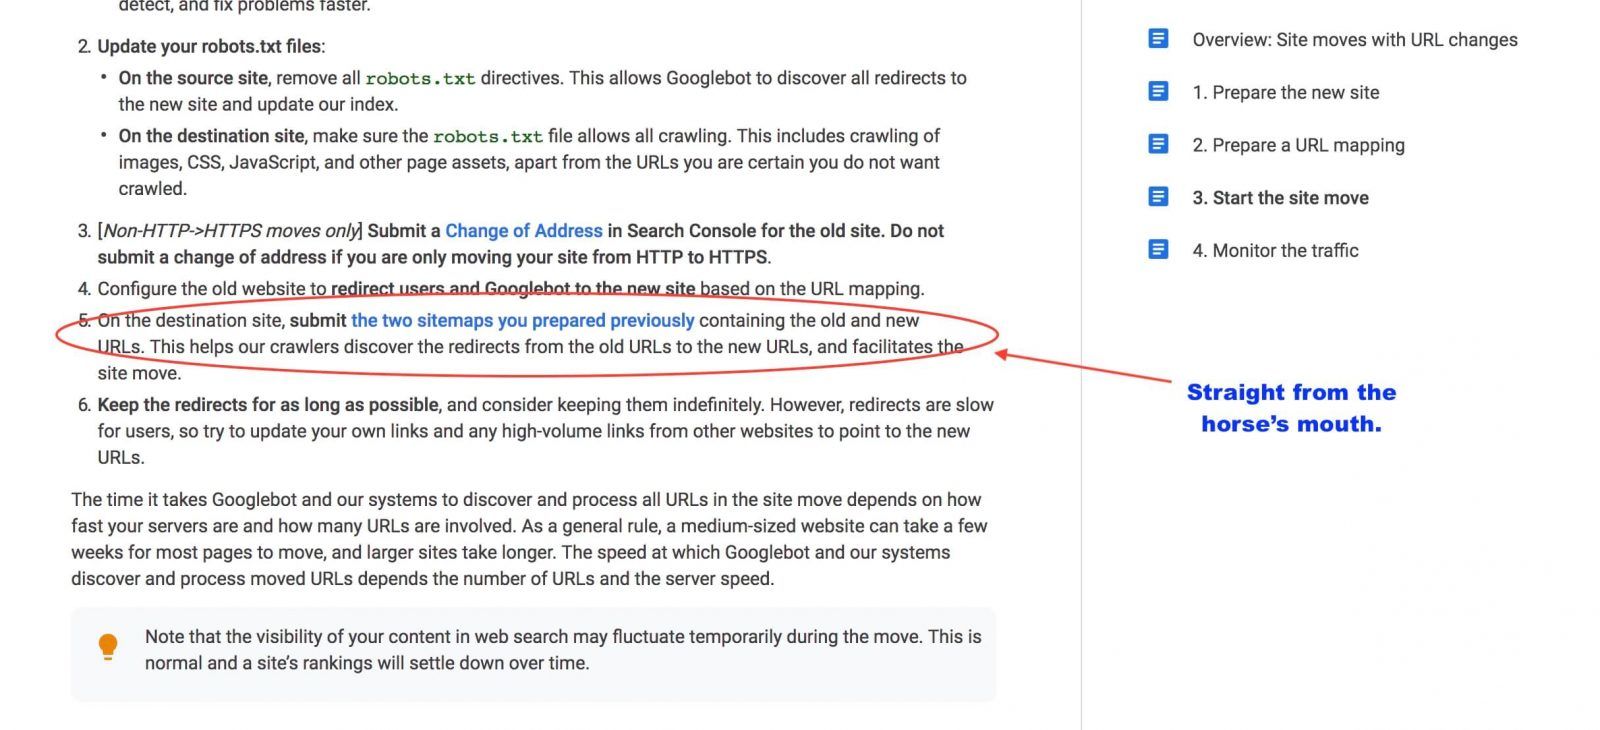
I wonder how many SEO professionals out there even know that this step exists… or how it can help as a secondary migration SEO tactic to ensure the site move goes successfully.
Whether you’re an SEO newbie or consider yourself an old hand at domain migrations — the single hardest SEO task to get right, I believe – it’s not publicized at all that with a little code snippet, you can easily customize your Yoast SEO XML sitemap to add in external sitemaps, per the above. (Shhh, don’t tell anyone!)
That’s what I want to show how to do today. It’s actually easier than you’d think, thanks to the code that Yoast makes available on GitHub… but it’s a well-hidden tip for sure, or it would be in a lot more “how-to” WordPress SEO posts.
NOTE: this only applies to WordPress sites that have the Yoast plugin installed. But if you’re on WordPress, let’s face it, you’re likely using Yoast. It’s still the single best WordPress SEO tool to ensure your site’s as search optimized as it can be without having to do too much manual labor on your own… which is when you’d hire me, of course. 🙂 Yoast isn’t without its flaws, but mostly works great out of the box.
Ready to get into some code? Here’s how to hack things a bit – to meet Google’s specifications above – when out-of-the-box functionality doesn’t cut it:
Customize Yoast SEO sitemap index
1) BEFORE doing 301 redirects: Locate your old site’s XML sitemap URL address. If you have multiple sitemaps, get all of those individual URLs together in a list.
Moving from OldDomain.com > NewDomain.com?
NOTE: You want to exclude those sitemap URLs from a sitewide redirect that would otherwise redirect everything over using the .htaccess file… sitemaps be damned. This is where it gets just a tad tricky: If you’re working with a developer, ask them to exclude the sitemap address(es) from the redirect rule using an .htaccess rule. (Here’s one way they might go about this; another way here.) OR if you’ve got a good web hosting provider, they may be able to do this for you, too. If you’re only redirecting parts of a site or doing 1-to-1 301s at the URL level, you shouldn’t need to worry about this.
2) Next, install the plugin Add Shortcodes Actions and Filters in the destination WordPress installation. (Don’t worry that it hasn’t been updated in some time; not all WP plugins (like this very simple one) require regular updates.)
Alternately: if you really don’t want to install another plugin and are comfortable using your WP functions.php file, you can add the below modified GitHub code directly there (Appearance>Editor>functions.php).
3) Copy the PHP code starting with
add_filter( 'wpseo_sitemap_index', 'add_sitemap_custom_items' );of the following piece of code into a Google Doc or somewhere as unformatted text, replacing “http://www.example.com/external-sitemap-#.xml” with your external (old domain/ old platform) sitemap URL’s as the directions here indicate:
Be sure to follow the instructions here EXACTLY and not to leave out the last part “return $sitemap_custom_items;” and enclosing
“}”. Also, you can see steps provided from Yoast here.
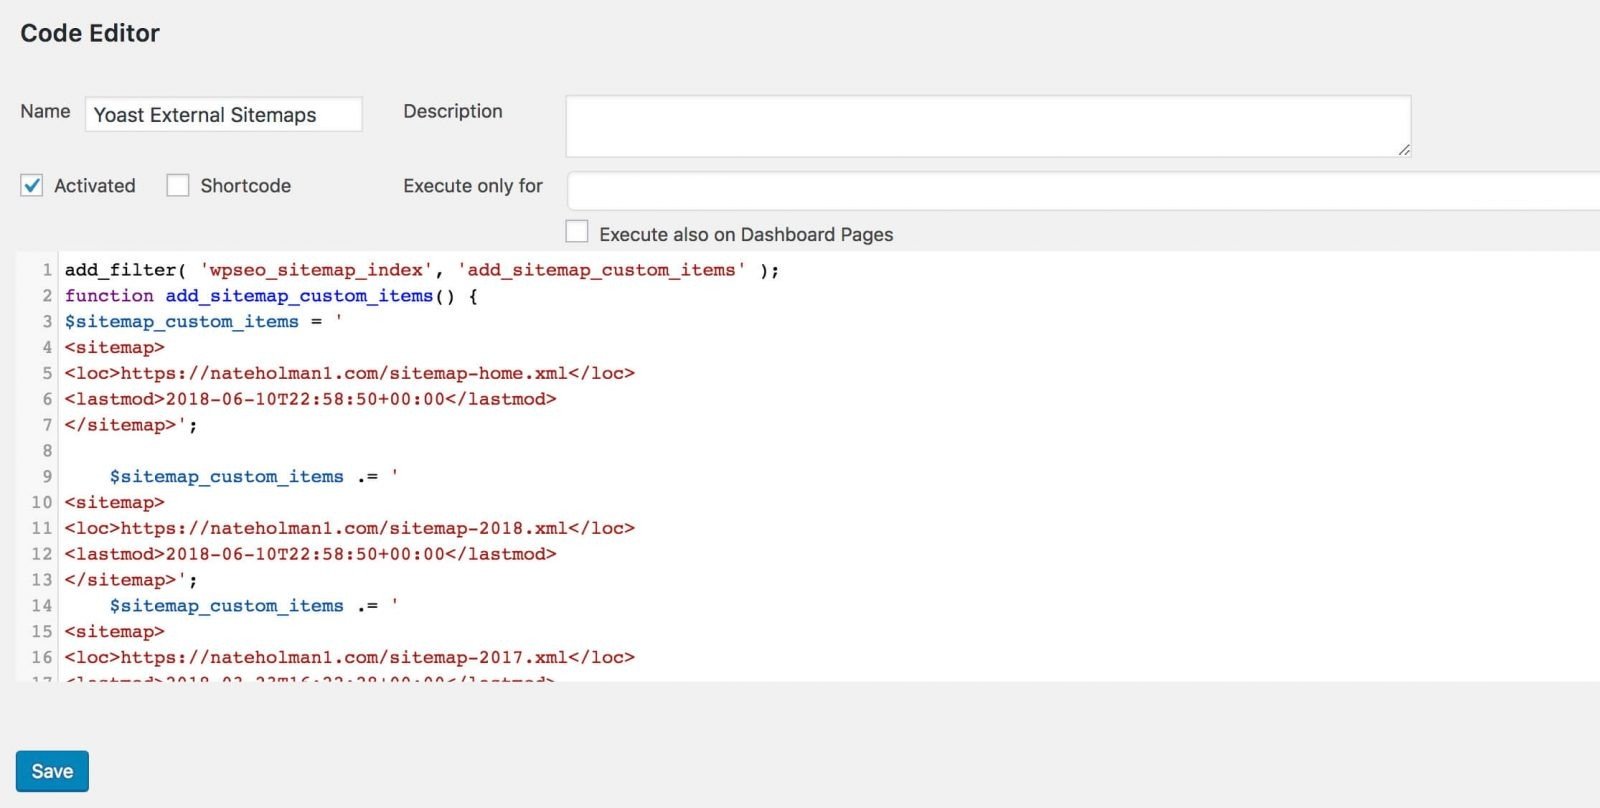
4) In the new WordPress installation, WITH Yoast installed and a Yoast XML sitemap index already configured: go to Tools>Shortcodes,Actions,Filters and add your modified code.
Name it “Yoast External Sitemaps” or whatever you like, and select the “Activated” checkbox.
End result should look something like this:
5) Go to [destination site address]/sitemap_index.xml and confirm that your external sitemaps are in the Yoast XML sitemap index. NOTE: as Yoast’s guide mentions, changes are applied upon next sitemap update. So to manually update the sitemap, just disable and re-enable the Yoast SEO sitemap feature.
You can also test the sitemap index in Search Console: Crawl>Sitemaps>Add/Test sitemap.
6) Complete the remaining migration SEO steps for your site move, including ensuring A) that all URL’s point one-to-one from old site>new site using 301s — with B) as little changed as possible in terms of page & site content between the two sites. A/B are the two biggest upfront success factors in the migration process, I think. Also submit Google’s Change of Address form (see link below).
You COULD also do #2 in Google’s guide here regarding Robots.txt, it’s pretty easy to do although in my experience I don’t believe it to be nearly as much as a difference maker as submitting external sitemaps to the new site.
7) As the last step, submit the “hacked” Yoast XML sitemap index, with external sitemaps, in the Google Search Console property for your new site. Also submit the site itself in GSC (Crawl>Fetch as Google).
Watch as Google bot recognizes the association between sites and indexes your new site faster and more successfully. Yay.

Through a Chicago-based SEO consultancy, Path Digital Services & Consulting, Nate offers custom, platform-oriented SEO services for small to midsize business and agency clients on WordPress, Shopify, Squarespace, BigCommerce and lots more. More about Path Digital ›
Leave a Reply