WordPress SEO guide for beginners
by Alexzander Caine on July 14, 2019
/ 0 comments leave a reply
If you’re using WordPress as your CMS platform, then congratulations – you’re using one of the best platforms out there when it comes to SEO.
The problem? While WordPress out of the box gets a lot right when it comes to Search Engine Optimization, there’s so much more you can do to improve your website’s online visibility.
The tactics and practices in this article will help you to optimize your site to send the right signals to the search engines, acquire more traffic and ultimately gain more visibility in search engines. Here’s how to SEO your WordPress installation in 4 steps.
1. Basic WordPress settings
When you installed WordPress, you had the option to choose some default settings and others that were pre-selected for you. Ensuring that you have the right options selected can make a huge difference.
As an example, during setup, you were given the option to stop search engines from indexing the site. You may have chosen this option due to ongoing development, or the site wasn’t ready to go live. You’d be surprised how many times people forget to turn this option off after they have completed their development work.
To check that this doesn’t apply to your site head over to Dashboard > Settings > Reading.
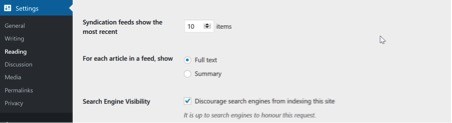
Make sure that your box isn’t ticked like the screenshot above. If it is, then it’s stopping the search engines from crawling your site!
General Settings – These will apply sitewide. The main setting you want to check here is to ensure the site URL is correct. You should be using an SSL for your site and if this was set up before you installed WordPress, then the Site URL option will reflect this. If not, then it will look similar to this:

NOTE, before you switch those URLs to use HTTPS, you should go over this HTTP to HTTPS guide to get familiar with the process required to switch.
Next, make sure your locale is set correctly. WordPress will add a code snippet on the frontend of your site to indicate the country your site belongs. Unless you installed a specific version, then WordPress defaults to the English (United States) value. If you’re located in a different country (Canada, UK, Germany, etc.), you will need to change this option to reflect that.
While you’re in General Settings, check the other options that are available. While these don’t directly affect your SEO, it’s best practice to choose the correct options:
Permalink Settings – This is important. By default WordPress doesn’t set SEO-friendly URLs for your site’s internal URLs. The platform uses the default: http://yourwebsite.com/?p=123. You need to change this to a more SEO-friendly URL structure.
Head over to Dashboard > Settings > Permalinks where you can adjust setting this to ensure they are friendly. You have a few options to choose from:
- Plain – this is the default one that’s used above.
- Day and Name – as it suggests, your URLs will include the day and month like
http://yourwebsite.com/2019/07/11/sample-post/
- Month and Name – Again as above but slightly different:
http://yourwebsite.com/2019/07/sample-post/
- Numeric – The URLs will be like
http://yourwebsite.com/archives/123
- Post Name – This is the friendliest version:
http://yourwebsite.com/sample-post/
As you can see there are several options. Unless you have a specific requirement then you should set this setting to use “Post Name.” This will give you the best URL structure for your site and avoid including irrelevant numerical values.
Lastly, go over to the Discussion settings. Again, they don’t directly relate to the site’s SEO… but as an example, turning on some options will help your site being inundated with spam comments!
The last thing you want is a load of pharma/casino related comments that contain dodgy URLs to be made live automatically when someone posts a comment. That’s going to send the wrong signals to search engines. Turning on these options will allow you to moderate what comments are being posted and by whom.
2. Yoast SEO Plugin
Once you’re done with basic settings that are included in WordPress, the next step is to enhance that functionality.
Using the Yoast SEO plugin (considered the #1 plugin for SEO) will give you access to many additional options that allow you to optimize advanced settings sitewide but also on a per page/post basis.
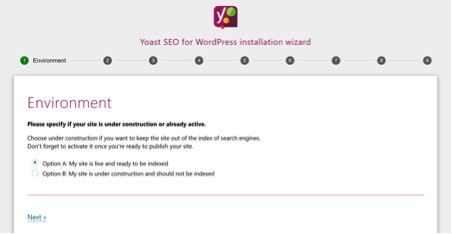
When you first install the plugin, you’ll be greeted with a configuration wizard to go through the basic plugin options.
Once these are all set, you will need to make some manual changes to further refine the settings.
Navigate to SEO > General and click on the Features tab. Here you can turn on all the options so that when you are creating or editing a post/page you will have additional fields that can be set (more on this below).
There is also an option to turn on XML sitemaps which you should enable. This will create a sitemap index link which will list all the pages/posts on your site so you can submit it via Google using Search Console. To view the link to your sitemap simply click the ? icon and it will display the link.
Head over to SEO > Search Appearance: there you will see tabs for the various options. The important ones to update are as follows:
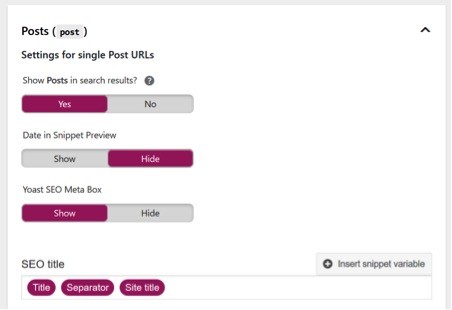
Content Types Tab – Turn on the options to show previews for each content type: post, page, etc.
The important option on this tab is the SEO Title options. These are used for every post/page that’s created on your website.
Generally, it’s advisable to keep this set to:
You will also have the option to adjust the title of each post/page when creating them in case your title is too long.
Media – Turn this option on to yes. All media that’s included in your content will redirect back to the original post/page and not have an additional page created for them. This will prevent thin-content pages being created which can be harmful to your site over the long term.
Taxonomies – In many if not most cases, it’s best to simply turn off categories and tags so that they are not shown in search results. You will still be able to categorize and tag your content pieces; they just won’t get indexed by Google. This prevents duplicate content issues. NOTE, if you DO you use categories to sort posts by topics, you can leave them indexable as long as you’ve got: 1) a topically distinct title for each category, 2) some unique, relevant content in the category description in Posts>Categories. Here’s a good post on how to optimize WordPress categories.
You can also use the option to remove the category folder (/category-name/) from URLs within this tab. Again, this will keep the ending URL nice and clean which the search engines will love.
Breadcrumbs – If you’re using a theme that’s coded per WordPress standards, then turning this option on will replace your theme’s default breadcrumbs with Yoast Breadcrumbs. The result is marked-up code (Schema) that is easier for the search engines to consume and classify. As a bonus, if chosen, your search results will stand out a little better.
Those are all the settings required to ensure your website has a solid foundation.
When you go to create your new content, you will now be able to use Yoast meta boxes (you can find this section under the content editor) to add in additional information that’s going to help with your SEO.

Focus keyword – add in the keyword that relates to the content that you are creating. This will be used by the plugin to determine how well the content is optimized for that keyword and show you this via a traffic light system. A green light will represent good, no work required, whereas a red light will be bad, and you need to work on it. SEO CONTENT TIP: keep your users in mind first by creating interesting, topically relevant content around the keyword. Don’t insert keyword variations where they don’t fit naturally. You can break up your post into sub-topics using the <h2> heading (Heading 2).
Here you can also change the SEO title of the page as well as adding in the meta description. Keep in mind that you want to create unique titles and descriptions for all your posts/pages — otherwise they’ll be fighting against each other over positions in search results.
3. Optimize WordPress Speed
Although the WordPress core is lightweight and SEO-friendly, the platform can be pretty resource-intensive, especially if you’re using a lot of plugins. SO, you need to make sure your web hosting is up to the job.
With many bad $1 web hosts out there, this can have a serious impact on the performance and speed of your site.
Page speed is an important factor when it comes to SEO; it’s not the biggest, but nevertheless important.
Ensure that you have the following items addressed to make ensure WordPress can load as fast as possible:
- Use PHP 7.0 or higher – Many web hosts still prefer to use PHP 5.* not only are these versions insecure but they perform poorly. If you can switch to PHP 7.3, which currently outperforms all other versions.
- Use HTTP/2 – This newer protocol helps to load site much faster. Each connection can handle multiple requests at once. Compare that to http/1 which has to open a new connection for each request to your site.
If your current web host doesn’t meet expectations or doesn’t have the features you need, then consider moving. Kinsta, WP Engine and many more are great when it comes to hosting WordPress and they won’t break the bank either!
Finally, use a good cache plugin. This will take care of all your websites assets i.e. CSS, JavaScript and image files. It will compress and optimize them, so they are as lean as possible.
Having multiple assets that are unoptimized will have an impact on your SEO. One of the best plugins available now is WPRocket. It will optimize all your assets and can speed up your site considerably. View an unbiased comparison here. (Another good option that’s free to use is WP Fastest Cache.)
If you are still having speed problems after taking all these steps then we have an advanced guide on speed optimization that can help you further.
4. Mobile Friendliness (Pick a Good Theme)
Your site needs to be mobile friendly. All themes should now be mobile-friendly out of the box, but not all are coded properly.
Although your website may look good on a mobile device, it may have errors which the search engines pick up on and flag your site as “not mobile friendly” accordingly. Such messages can be seen via your Google Search Console account.
If you’re just starting off, then this is the perfect time to pick out a well-coded professional theme.
Although there are over 5000 themes in the official WordPress repo and countless more on marketplaces, there are only a handful which we think are good for speed and SEO.
Themes like Astra and GeneratePress are freely available from the official repo and come with demos you can import. They are coded with search engines in mind, meaning the code is marked up with Schema that is contextually meaningful to search engines. On the speed front, they use lightweight, optimized code that isn’t bloated and results in faster page loads.
Of course, these themes are mobile-friendly out of the box, with multiple options you can choose to further enhance the mobile experience for users. Read a full comparison here.
Conclusion
The basic steps you’ve taken here will ensure that the foundations of your website are in line with SEO. You won’t have major errors or missing functionality that hinder the ability of your site to compete in search engines.
The next step is to add quality content to your site that provides value — and then promote it to start getting noticed by the search engines — but having these foundations in place will help greatly once they do.

Alexzander Caine has written a legion of guest posts. He is a content coordinator for valendigital.co.uk who loves all things tech. His experience includes Laravel programming, web development and content marketing. In his spare time he loves to binge watch Netflix and is a huge Marvel comic book fan!
Leave a Reply